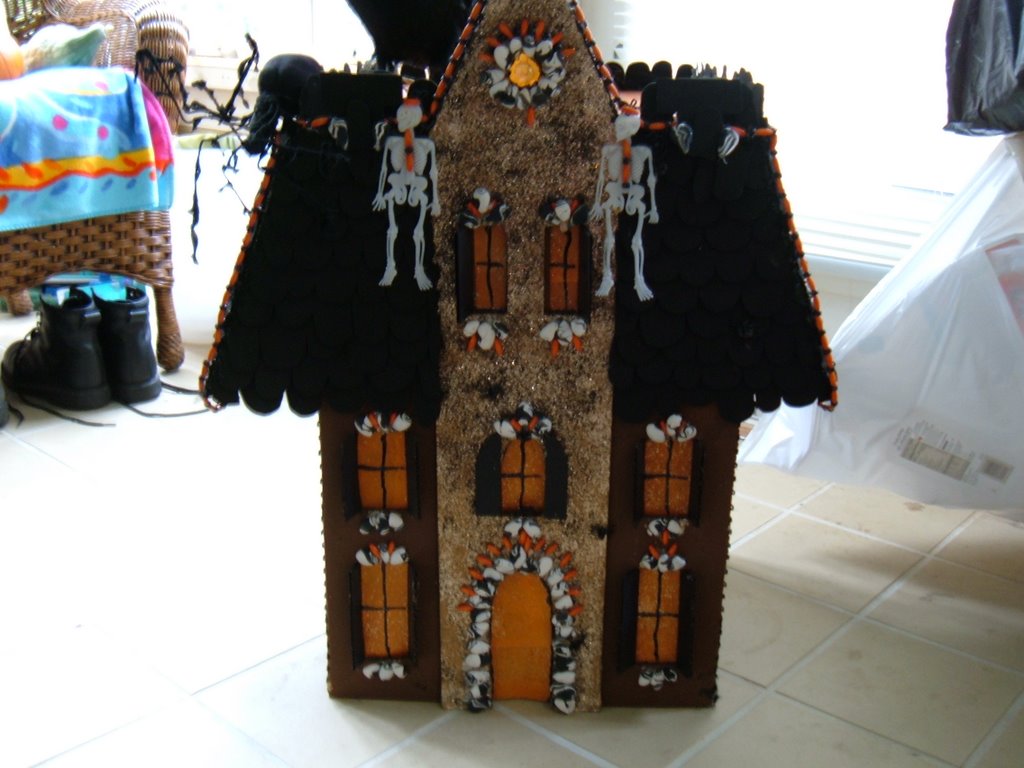
 Here's the finished product--you'll be refering back to this as we go along.
We're going with the October 10th tutorial on most of this. So I deleted a bunch of stuff and will continue to delete from this tutorial as the other one is completed.
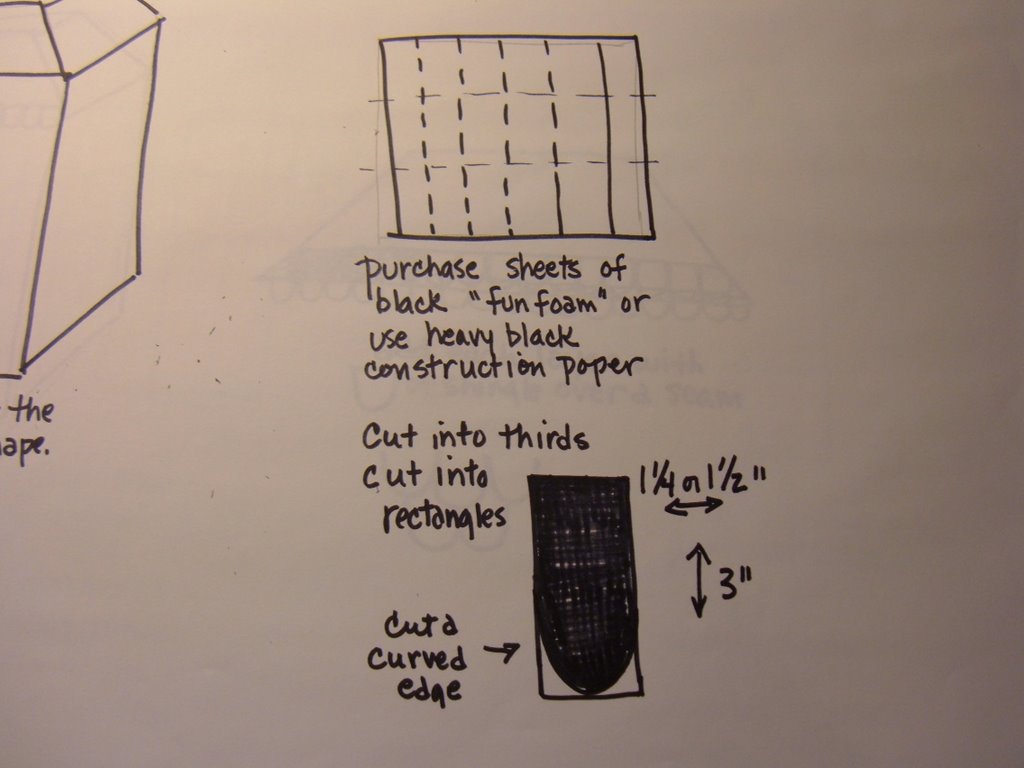 This is a drawing of a rectangular sheet of black "FunFoam". About the size of typing paper. (Joann's or Michaels) When I made my house years ago, I cut all the roof shingles with scissors. But "FunFoam" cuts easily with a rotary cutter and ruler--so do it the easy way. Then you only have to trim the curved edges with scissors. Fun to do this while watching television. Again the size here is for a 18 each wide box. So cut the foam sheets across into 3 inch wide strips and then cut the strips into 1 1/2 inch rectangles. You'll need about 10 sheets of foam. You can always return any uncut sheets. Or use black construction paper but it won't have the "dimensional" look.
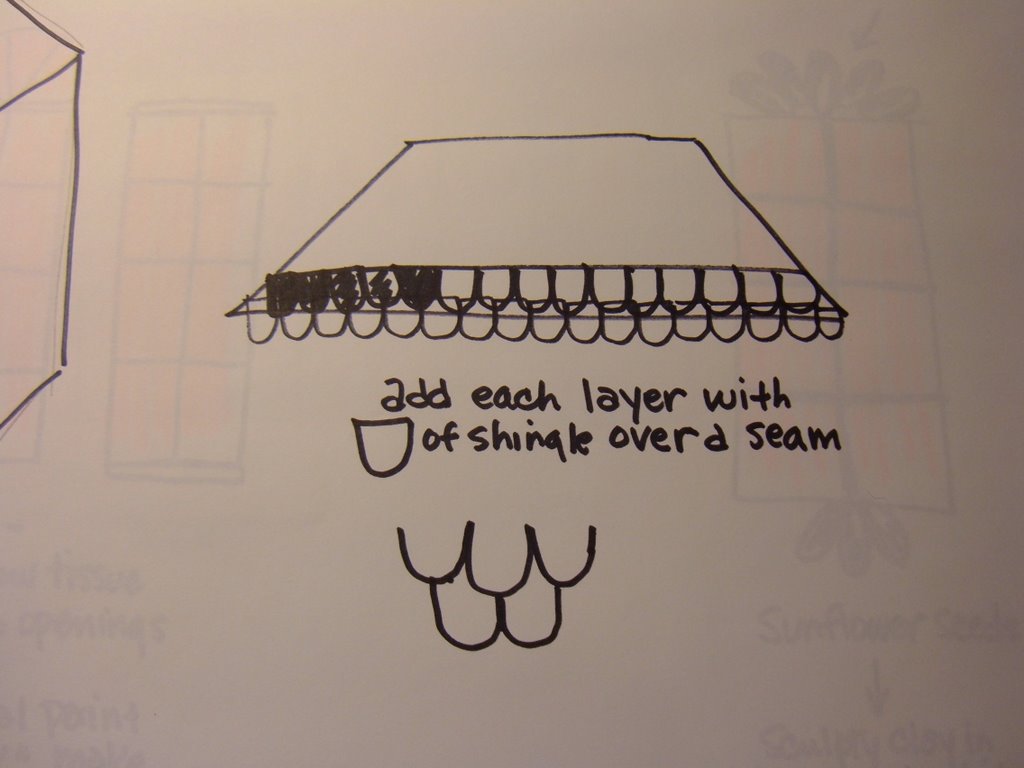 Start shingling your roof. Do one side completely and then do the next. I did the front, back and then the sides. Overlap the joints as you work from the bottom edge to the top. Just barely cover the previous row of shingles with the next row---that way you won't be making foam shingles forever. But do cover all the cardboard. Use a glue gun. When all four sides are done, finish off the seam edges with another layer of shingles. Or use black gimp braid.
 Now from the inside of the box, glue orange or yellow tissue paper to the inside of the windows to give the house a "glow" when we light it up. Oh, yeah! We're going to add a little light to this house. A night light. So glue your tissue paper to all the windows and if you want to add some spooky cutouts or skeletons to the inside of the windows--do it now. I used Shiny Black Dimensional Paint (Joann's) to draw the window dividers onto the front of the tissue paper in the windows. Lay the box on it's side to make it easier to draw and paint. OR use little twigs from the yard to make the window frames and dividers. Looks real cute. Cut them with your garden clippers and hot glue down.
Now you get to decorate the house. I didn't put any windows on the back of my house. Instead I glued two strips of dress gimp (black braid) down the back of the house and filled in the center strip ( about 5 inches wide) with glitter. I used glitter on the front also. You can glue gimp anywhere on the house that you think will look cute.
I added a string of orange and black beads to the edge of the roof in a scallop. I made the string of beads. Just be very careful not to burn your fingers with the hot glue--use a chopstick. I glued spiders and bats on the roof. I glued real sunflower seeds to the house originally as a very attractive design element. The mice in my attic loved the tasty seeds. So I finally made fake seeds out of black and white swirled Sculpty clay, shaped the clay into seeds about the size of my pinky fingernail and baked the fake seeds. I then glued them to the house. Refer to finished house picture--in fact use it as a guide to "seed" placement. You can also use big beads.
I added spiders, a bat on the roof peak, a giant tarantula and the plastic skeletons. I even glued a skeleton in the doorway (to the tissue paper from the inside). When the light shines "just so" the lucky children "see" the skelton in the doorway and scream! I found a lifesize crow and attached him (or her) to the roof.
This house is about 6 to 8 years old and has been on display in the public library or a school library every Halloween (usually the entire month of October). The condition of the house is as good or better than the month it took me to make it. Whenever I find a "cool" item that would look good on the house, I glue it on. I made the house with only a small photo from the Martha Stewart catalog as a guide. I had no measurements. No idea if it would work. I just tried my best. And worked out the design elements as I went along. I've done the hard work. Your house will go together faster. If you need help--I'm here. Just blog me.
1 comment:
Thanks Joanne,
this looks like a fun project!
Post a Comment