Monday, October 30, 2006

Happy Halloween Quilt-- ArtShare Meme

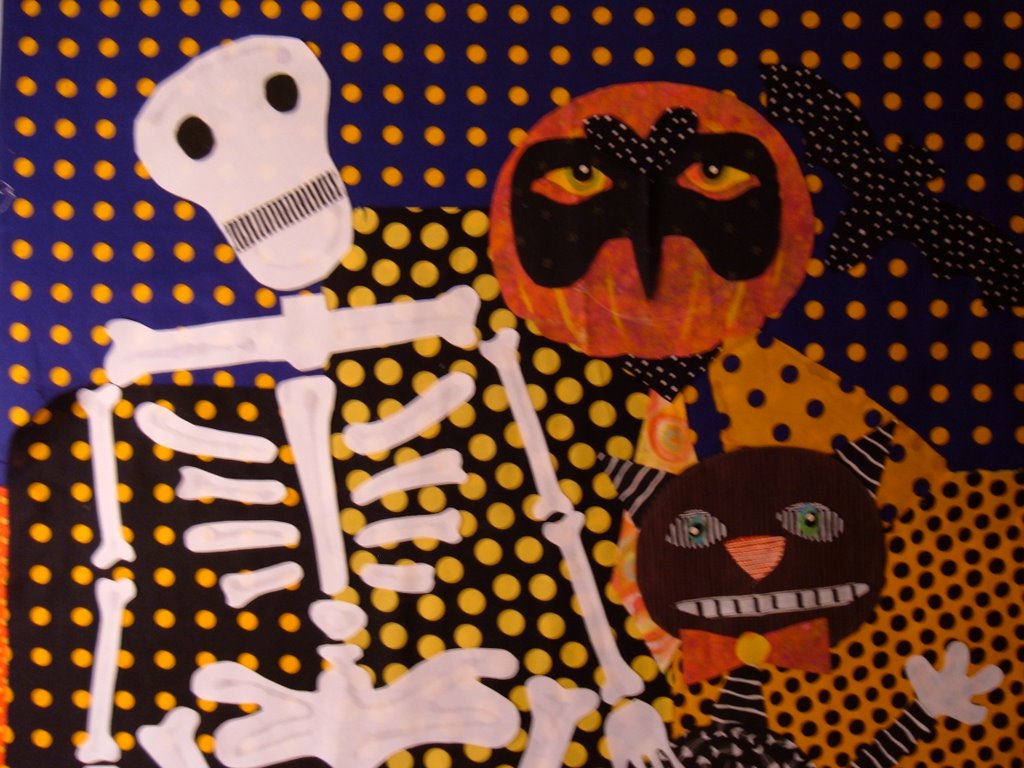
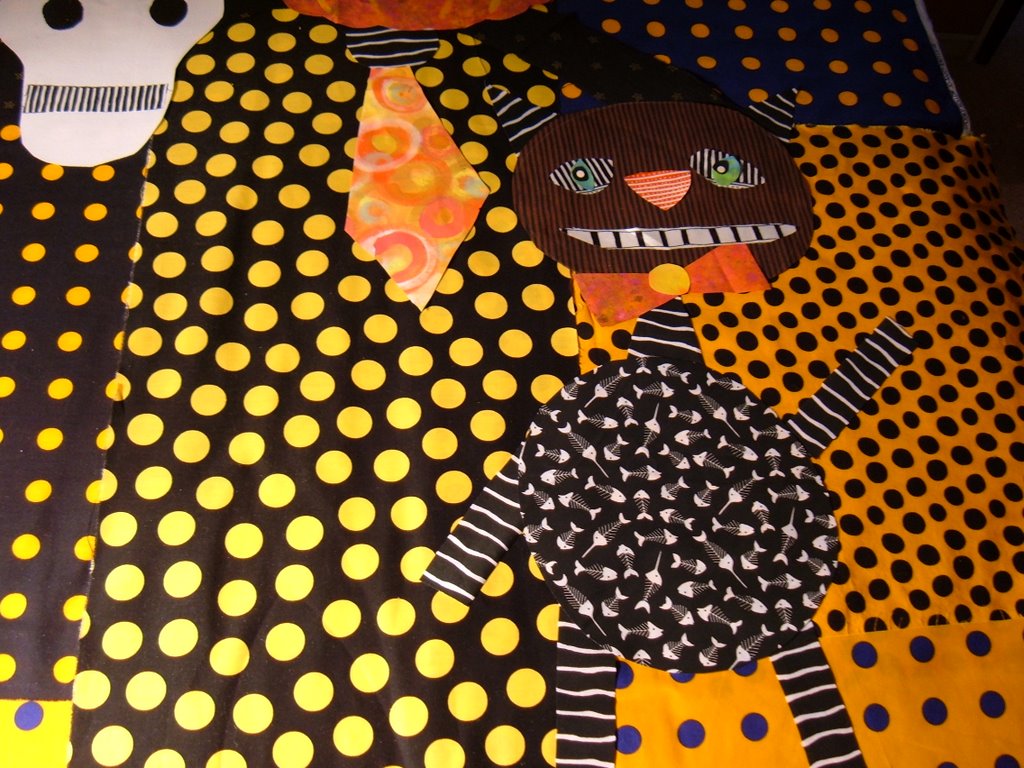
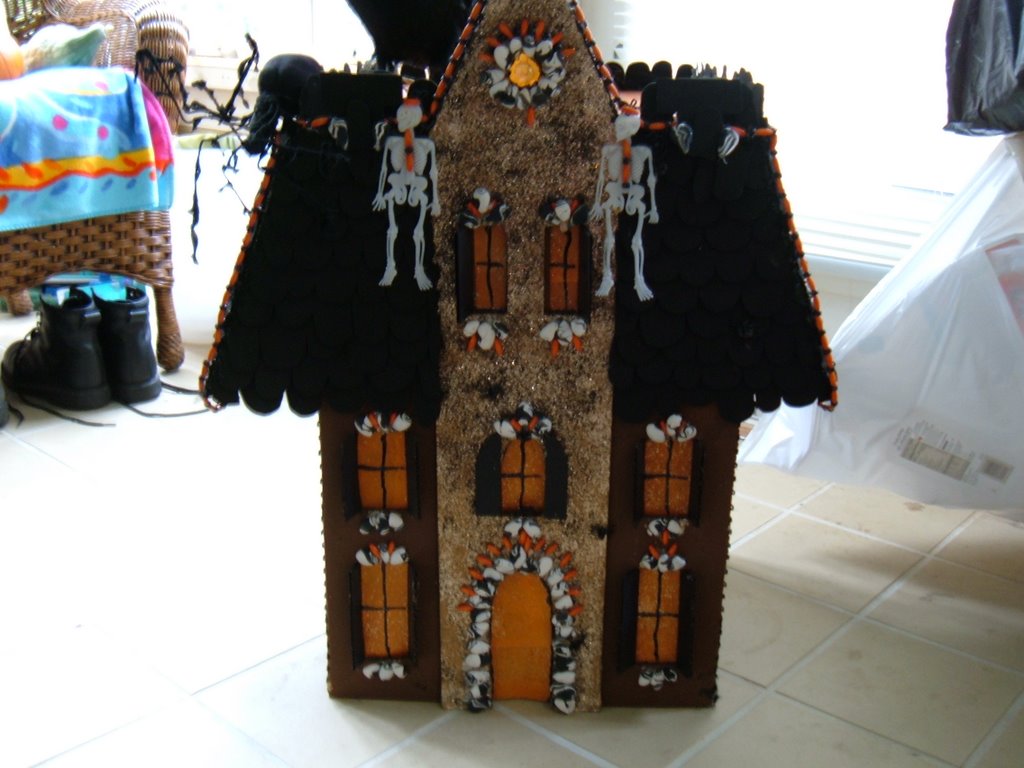
Here it is. Finished. Just. And hanging up at the library. I could have spent the next 15 years trying to get it "squared" up but by then the poor thing would be hankerchief size.

I have my First Rule of quilting. When you make a mistake. Make it big. Exaggerate it. Then it will look like you meant for the error to happen. Small mistakes look like mistakes.

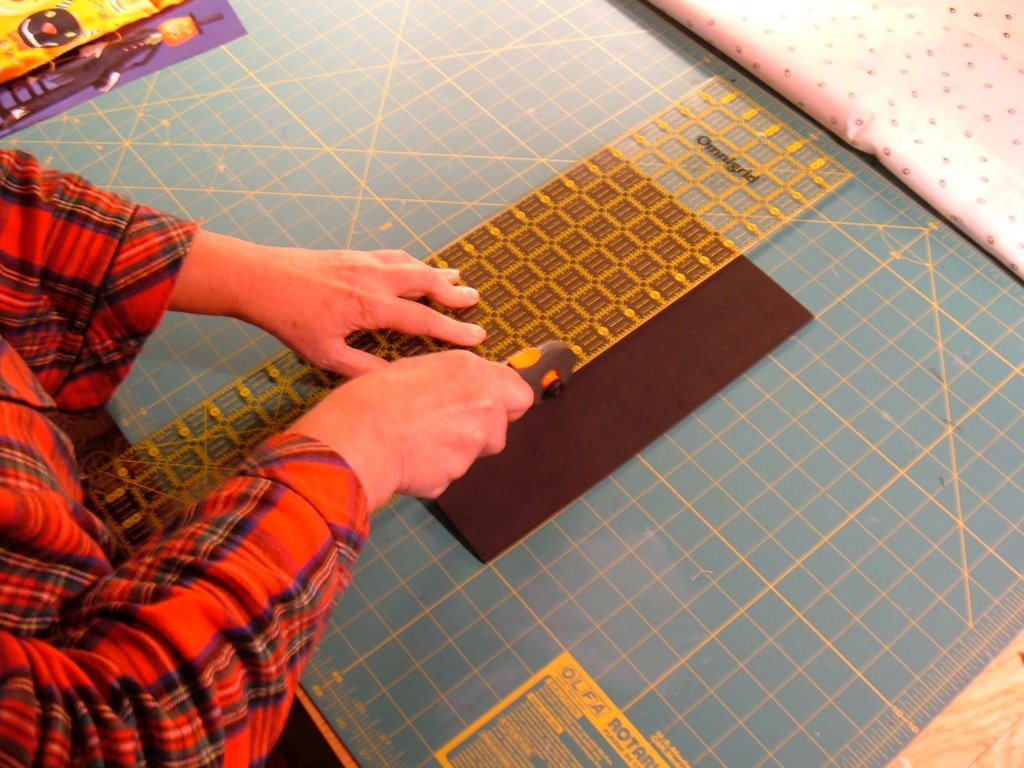
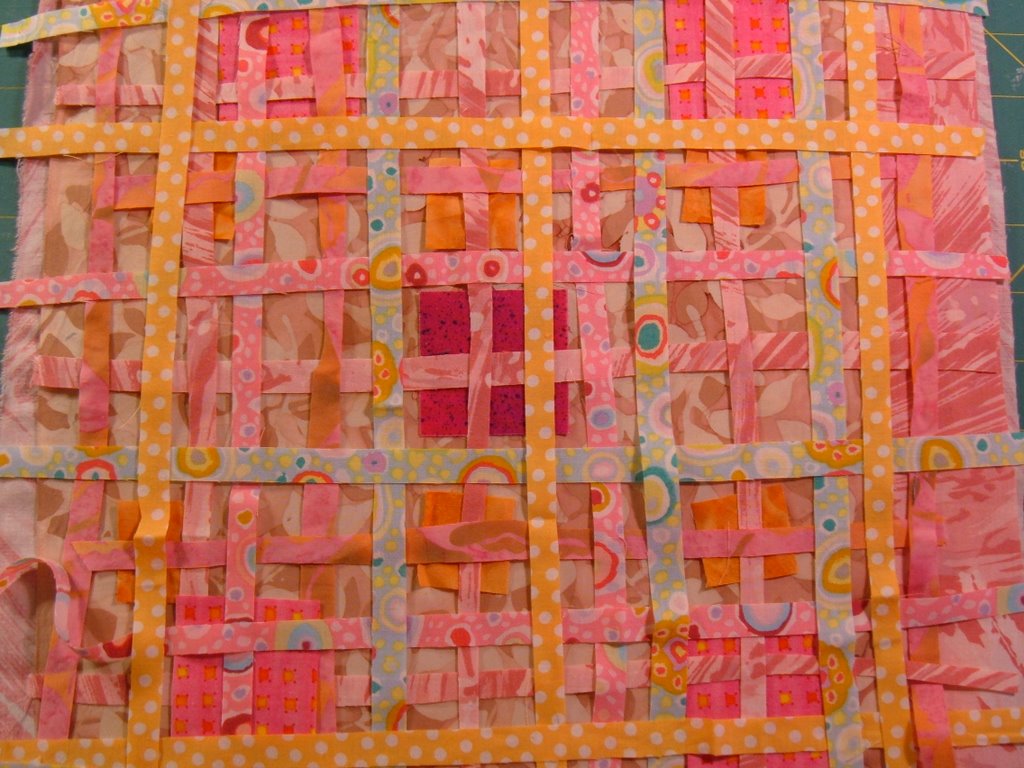
If I had freehand cut the quilt to what passed for a rectangle, well, it would have been okay. But because I actually tried (more cuts than I will admit to) the result looks like I don't know what I'm doing. The top goes up a bit in the middle and the bottom does also. The polka dots don't help. Oh well. Live and learn.

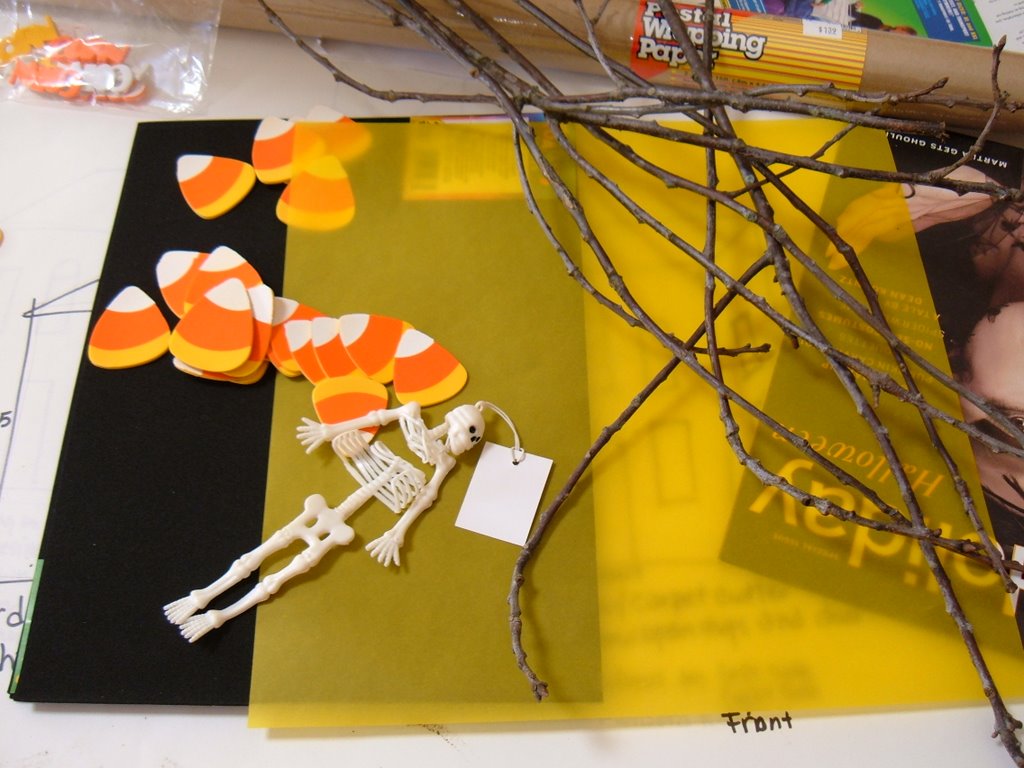
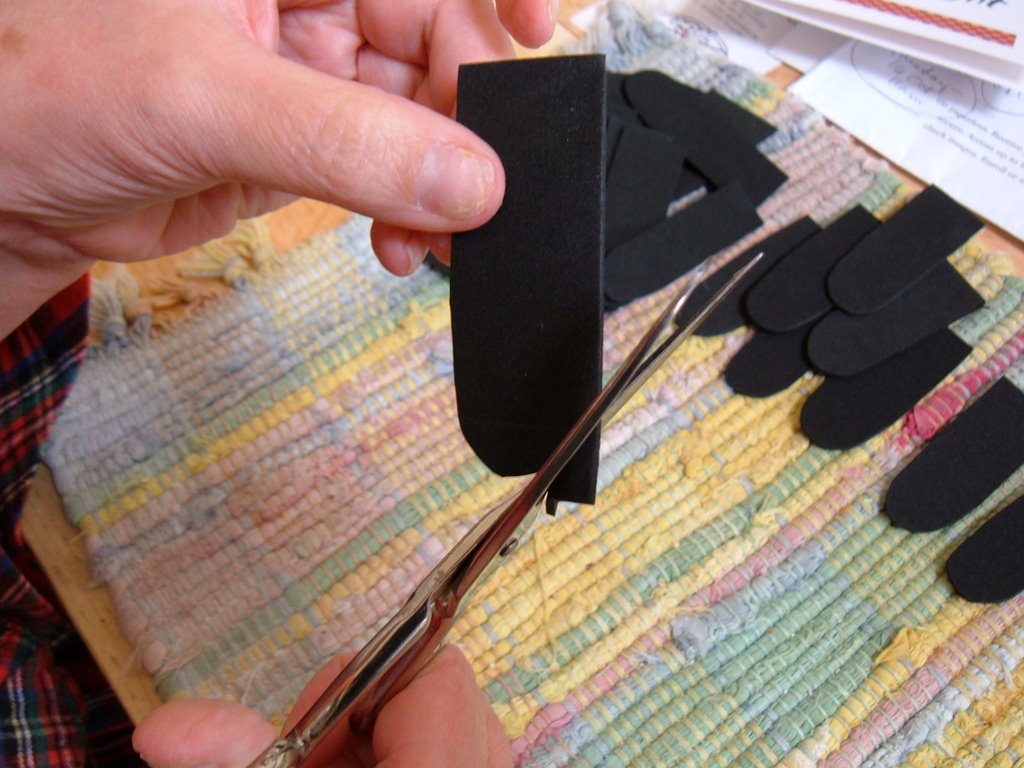
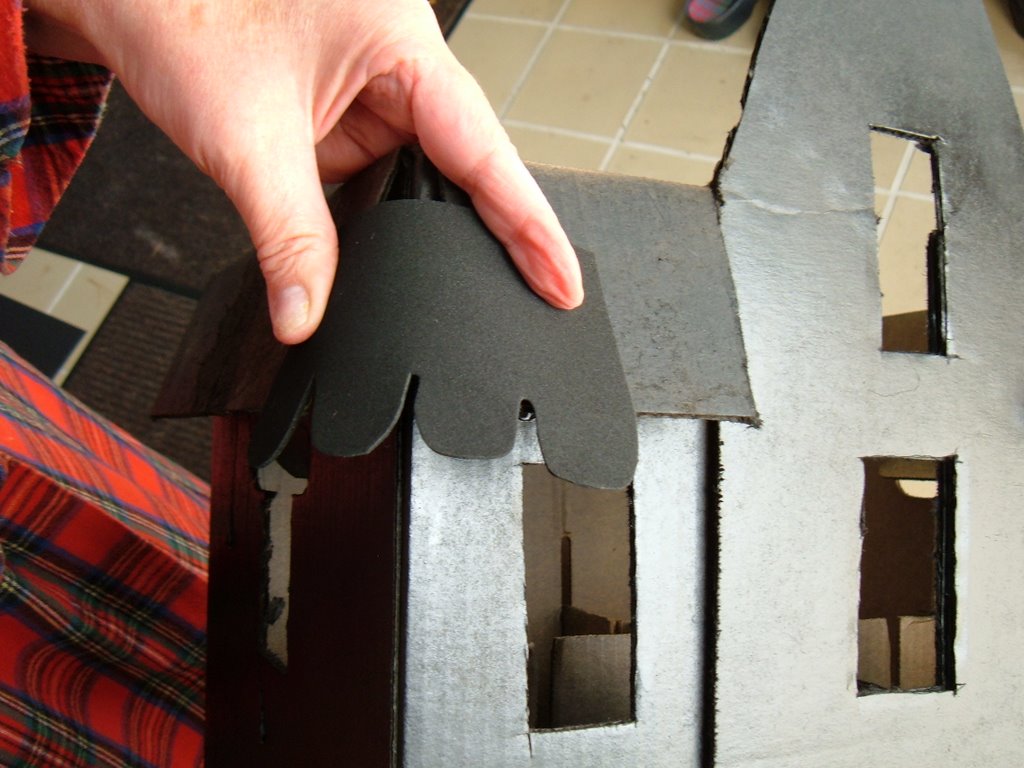
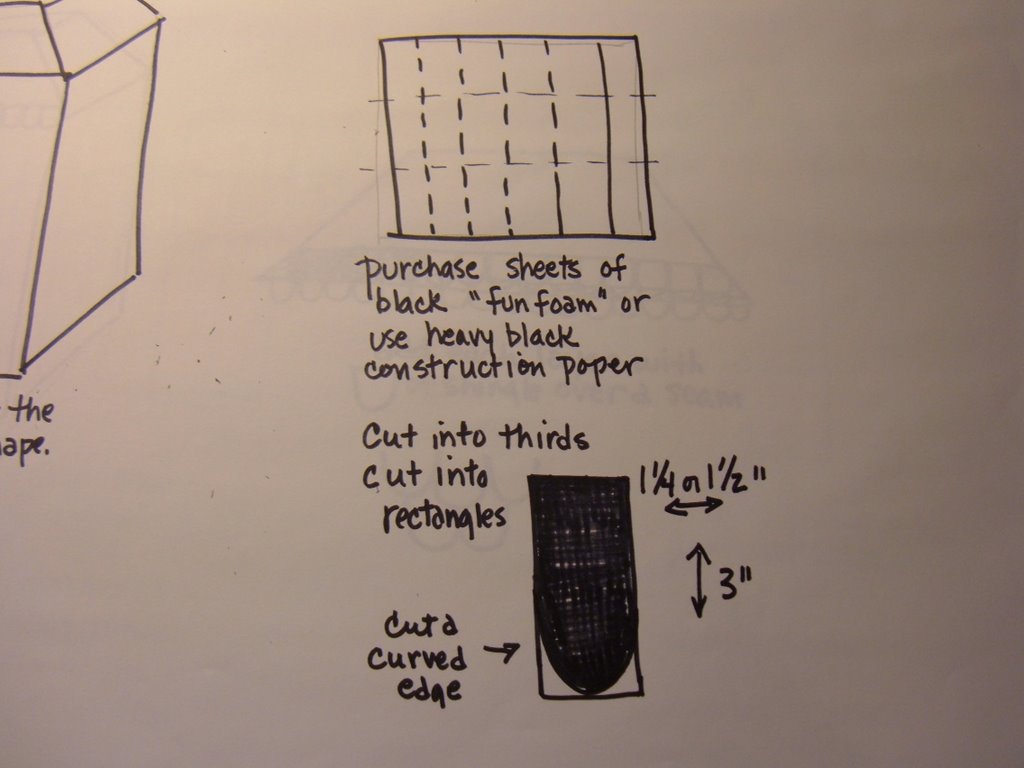
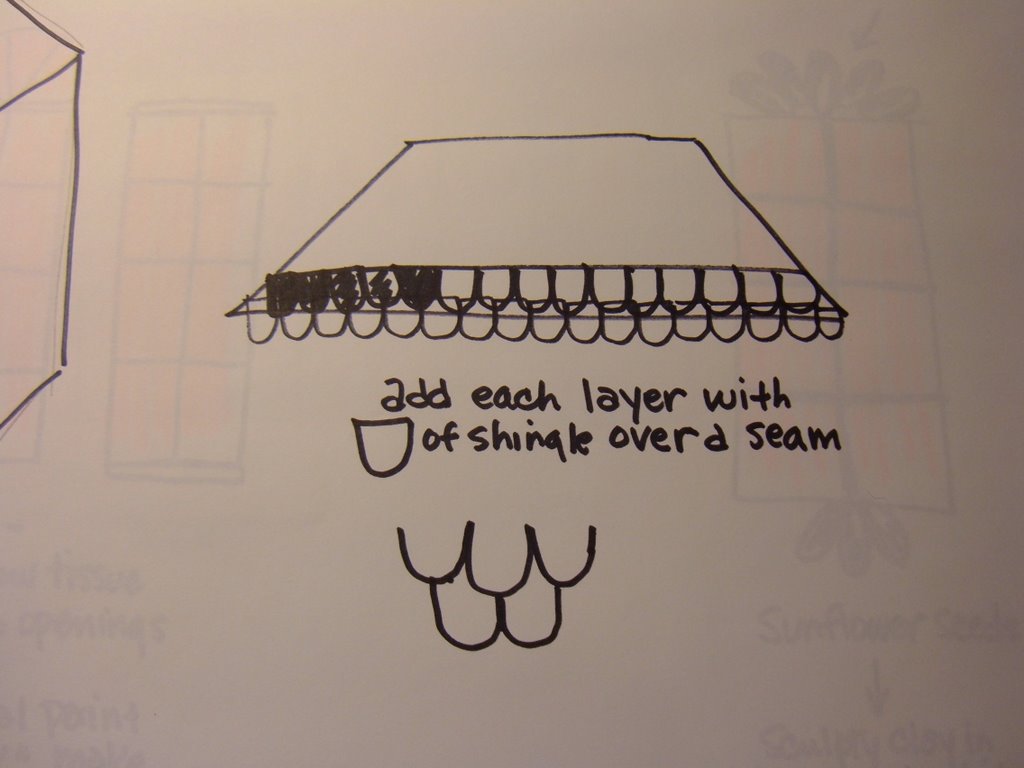
Also, I began with the plan of following Pamela Allen's tutorial from QA. I did amazingly well with the background and then did not follow Pamela's directions to quilt, bind and otherwise finish that work before putting anything else on the quilt. Pamela was correct in this. It was very difficult to get around all the bones and stuff when quilting and I will try ever so hard to do the next one in Pamela's "correct order of things". I even think the squaring up would have worked out better without the lumps. Duh!

ArtShare Meme
I'm joining up with Emmy and Deborah for the ARTShare meme. The first FIVE bloggers who sign up on this post will get an actual piece of art from me. Fabulous, Huh? Could be a TrashFormation or a watercolor or a paper collage. Could be anything. We'll exchange info by email (address) and the little gift of art will wing it's way to you. The only requirement: then you must post on your blog and send art to five bloggers. Okay?

Friday, October 27, 2006

Here's Looking At YOU!

I'm cute right? Anyway, today I got off work at 1:30 ish and got home and made some lunch--well, I did eat the brownie first and the sandwich second --but it was lunch. And I stared into the fridge looking for something to jump start into dinner. I do so love the look of surprise on my dear husband's face when there is actually some food being prepared for dinner, in this house, not a restaurant. I found some flour tortillas and some cheese and I delved into the depths of the freezer and scored some ground beef. Looks like we'll be having some Burritos tonight.

I also did laundry, read blogs and finally ironed about 20 pillowcases and a bunch of red shirts. Target makes everyone wear red shirts and khaki pants to work. Red used to one of my favorite colors. Now I'm beginning to resent it.

I'm having those pesky feelings of guilt again. My husband has always been the sole provider of cash for this household. I'm sort of along for the ride, so to speak. I do work, but what I make doesn't amount to much. And I do spend it having my hair and nails done. I am SO shallow. What I have left over I spend on fabric, beads paint and other stuff for "my art". This looks so terrible when seen in black and white on the screen!

Every few years-- even worse, this doesn't ALWAYS bother me--- I get to feeling that my poor husband is being taken advantage of. True, he is the only one around here who has skills people will pay for, but still. See, that's what I think about if left too long with nothing to occupy my mind.

Wednesday, October 25, 2006

Corey

I first met him when he was about 3 or 4 years old. His parents (new friends of ours) dropped Corey and his sister (2 or 3 years old) off to stay with me while they went to an evening class. I put the two of them to bed in the middle of my king size bed. When I went in to check on them they were sleeping curled together like two little kittens. Probably scared and comforting each other in that big and very strange bed. That was 30 years ago.

Corey's little sister called early this morning to tell us that her brother had died during the night. She was crying but bravely making the calls because her parents couldn't do it.

My heart is breaking. Corey and his family are so much a part of the fabric of the last 30 years. Florida, Germany, France and North Carolina. Family vacations. Family. Friends.

There are no words. Just tears and pain.

Tuesday, October 24, 2006

Make it Your Own

I just read my Tuesday "Painter's Keys" letter and Robert had the Five Principles of Success for Starbucks.

1 Make it your own
2 Everything matters
3 Surprise and delight
4 Embrace resistance
5 Leave your mark

Robert felt that each of us--artists--do these five things each time we enter our work space to work. I think we do each of these things whenever. I know that these five principles are in place each day when I work at the library.

I mention my "library" often. It's really a pretty incredible spot. We live in a small town of 20,000 and our library does 350,000 transactions in a year. We rank third in the state of Maine. Our patrons love to read. They reserve tons (literally) of books. Families stop in for library visits weekly and I have stamped little hands from baby to junior high in the 8 years I have worked there. We have seasonal hand stamps for the children. This month we have Hello Kitty, a pumpkin, a scary bat and a dinosaur.

I have also chatted with senior citizens--perhaps one of the few conversations they had each week--remembered their names, saved books for them, asked about their gardens or family. I have also mourned their passing. We all do.

And that's what I love the most about my job. Each employee makes the job "their own". We smile, remember names, talk about quilts (me!), recommend books, laugh and enjoy life. For each of us, our library is the best place to be--the best job to have. Yeah, we have crappy days but we get over it. Tomorrow is always going to be better. And it usually is!

This week I am working at the library alot. I'm laughing alot. I just wish I could drag my sewing machine to the library and sew while chatting with the patrons. Now that would "make it my own". Maybe that would be a "good thing".

Sunday, October 22, 2006

Work, Work, Work

No pictures as I didn't even THINK you would want to see me working. At the library most days. Yesterday--Saturday--I worked in the morning. I am SO NOT a morning person and it was truly awful yesterday. I had worked Friday afternoon and we were SLAMMED and left a mess when we finally closed. Needed to face that first thing and clean it up. Then my co-worker, a really wonderful woman, said "Let me do that, I'm younger than you".

Made me wonder the rest of the morning. Do I "work" like an old person?

Then I returned home and made lunch out of the fridge leftovers for G and I and then out to the annual "Leaf Shredding". 20. Twenty. 30. Gallon. Garbage cans. Of leaves into the garden. And after scooping the leaves into the shredder I got to pull, carry, shove and tip those cans of leaves into the garden. So far away. Finally, G took pity. Carried the last 8 to the garden for me. We still ended up shredding in the light of the garage lights as the sun went down. Like last year.

One funny thing. G had one of the car garage door openers hung up to use to open the garage if we needed "beverages" or bathroom breaks. All other access to the house locked. Well, you can guess what happened. Battery failure. A quick run across the street to Peggy's and we had a new battery. We also had all Peggy's leaves. Nice Maple Leaves. Thanks, Peggy.

Now the garden beds have nice thick covers of shredded leaves. Good Night Sweet Garden. See you in the Spring! I'll see the rest of you later this week. I WORK every day!!!!! At the library. Wish I was working in the quilt room. Sewing my Halloween Quilt. Boo!

Friday, October 20, 2006

Halloween Quilt

A very quick post. Blogger and my internet connection are acting very goofy so this may go nowhere fast. This work is again less than the sum of it's parts. I free cut the skeleton and bones yesterday. I like it but I don't LOVE it.

You haven't seen the pumpkin head before. Pretty intense.

I couldn't get the whole thing in the picture without getting "extra" things which detract. So I moved as close as I could and then shot the other parts like the feet. What do you think?

Tuesday, October 17, 2006

In Progress/Push Off

Yesterday I procrastinated and finally at 3:30 I actually attempted a "Pamela Allen" style background. The only "clean" spot for working was my bed. So I threw the covers back and cut a nice piece of black and white for the backing. Cut a piece of fusible batting. And then searched my overstocked fabric closet for Halloween polka dots. I made several mistakes. but eventually I worked out a pleasing (to me) background. I pressed. I ironed. I turned. I sprayed fabric adhesive. I pressed. Then I moved the fabric sandwich to the floor--where I should have been from the start.

I moved the aborted first attempt bits to the new background. Love the kitty. Scraped the dino. Scraped the convoluted waistcoat and tie on the Pumpkin head. Decided to make a skeleton out of white twill. I am feeling more positive about this new way of working. Making the background first. See, I never work that way. I make the center of attention and then fill in around it. Always have. But it takes longer and there are always "issues". But with polka dots it's never going to be easy. I may stop at three Tricker Treaters. I had been thinking of making cute feet and hands for everyone and a bag for the treats. There was going to be this cute commercial Halloween fabric border--but it got all "chippitychopchopped" up in hopes of being part of the background and then it got pushed off. In fact, great wads of fabric got pushed off.

And. And. I thought of a fabulous NEXT project to make. I actually have "future plans". This is so NOT me. Lately. I am absolutely thrilled to have a possibility in my future. Sonji was right. Nothing wrong with 2006.

Sunday, October 15, 2006

Tutorial Part Three of Three

I'm using the pictures in the exact way Blogger decided to load them. It's been one full hour since I decided to post. Anyway, this is the back of the house, no windows, so I usually do a "decorative" treatment. I used the adhesive backed candy foamies. Eleven of the big ones in the package. Eleven. Interesting.

Finished Little Spooky House. I cut the yellow vellum to fit the windows plus 1/2 inch and glued it to the back, inside of each window. You can also see the roof shingles all finished. And I used my garden snippers to cut the branches into window trim for each window. I glued the skeleton to the side of the doorway. I was going to put him inside the doorway but the door was too short.

This is how the house looks with the sunlight filling the house. You get the same effect by adding a little 10 watt nightlight to the inside of the box. My box has a bottom. It was a liquor box and has those inside bottle sections. I didn't want to do all the cutting to remove the bottom so I would have to cut a hole to insert the nightlight. If you removed the bottom flaps from your box--then just set the house over the nightlight. Easy Peasy. The number 11 big corn candy is next to the door and the smaller corn candy on each edge. There are four small candies on each side- two next to each other on the left and two next to each other on the right. Ten.
The peaked roof line. I used a scrap of Foamie and free cut a little bat. He has orange eyes. If I can find a small plastic spider or two (or three) I will add them to that branch sticking up off the roof. If I had some black gimp braid around the house, (my house not this house), I would hot glue it around the top roofline edge for a finished "look". I may add some of my Sculpty sunflower seed beads to the house--but they may overpower the simple design.

I'm very glad I went to the time and trouble (!!!!!!) to make this tutorial. I love my new little house. I think I'll take it to work with me tomorrow. Now to the workroom. I am making a Halloween Quilt and it sucks in a major way so far. So I'm going to take my Quilting Arts magazine article by Pamela Allen in there with me and make a background like she does. Yes, I am. I may even copy her tutorial--exactly--so I get a feel for the way it's done. Mine will look different because it's me. I just gotta be me. All polka dots.

Tutorial Part Two

If I didn't have to work or watch television, this would be getting done faster. Anyway, while I was gone, the cardboard box got sprayed with flat black (Joann's $3.49). I didn't shake the can for the full 3 minutes. The Paint Police will write up a citation. I also placed a ruler--12 inches tall--so you would know just how small this house is. All the windows are now cut with two on each side also. One over the other.

I went to lunch with a friend on Friday (the only day I didn't have to work or watch television) and suggested we go to a restaurant near Joann's so I could get supplies. I found a little rubber skeleton, some foam corn candy, a sheet of yellow vellum in the scrapbook section ( windows), and the last four 9 by 12 sheets of Foamie in black for the roof shingles. The branches are from my front yard. Or as we say in Maine-- yahd. The dooryahd to be specific.

Here I am this very morning in my red flannel robe cutting the sheet of 9 by 12 Foamie into strips that measure 3 by 12. Then I cut the strips into 1 by 3 inch shingles. I used the ruler for the big cuts and sort of "free-cut" the inch wide pieces. Some were fat. Some skinny.

Here I am at the breakfast table trimming one edge of each strip to make it rounded. Now when I made the REALLY BIG Spooky House I did this cutting and trimming for what seemed like weeks. Wasn't really. For this tiny house I was done in like 10 minutes. I cut up two sheets of Foamie (2mm-59 cents each).

Because the roof edges were "open" and didn't meet ( see first photo in this post), I cut a larger rectangle of Foamie (measure your own little roof edge to find out how much you need) I then cut a scallop into the bottom edge to look like shingles. I hot glued this piece to both sides of the roof edge and did all four corners. Then I made two rows of hot glue between two corners and placed roof shingles along the edge, even with the corners. My roof wasn't very deep so two lines of shingles was enough. I lined the second row up with the top edge of the roof line.

Now I'm going to try and load the final 5 pictures. Blogger is taking longer to load than it took to make the house. Bad Blogger.

Blog-O-Versary!

A whole year has speeded past..... at times, it did seem to be crawling, but over all, it seems too fast. I began blogging as a way to write about my day, my thoughts and my projects without boring my friends stupid. Yes, I was even asked to stop emailing on "friend" if I couldn't stop with the "lists, garden info and other crap". So I stopped emailing her and started blogging.

Now my daughter (Slambo) has started her own blog and she has a lovely way with words. And televison reality shows. I love reading her "take" on Project Runway" and "Rockstar". I don't think she will ever watch, and report on, TopChef or Survivor but I'm sure she would be witty and cut to the quick.

I am amazed at the variety of addresses and world locations for the readers of my little blog--and it is little, compared with the mega blogs with thousands of readers each day and 100's of comments. I'm content with my small circle of friends. I thank you for reading, I thank you for your comments, and for those of you with blogs--I thank you for letting me read about YOUR life.

This is really an amazing thing. "You've Got Mail". Powerful.

Monday, October 09, 2006

Actual Cardboard Box Tutorial

This is my cardboard box from the liquor store and some extra pieces of cardboard I found in the library trash. My mat knife or carpet cutter. My ruler, marking pen and painter's tape is somewhere on the floor along with my hot glue gun. Ready? My box is 14 inches wide, 10 inches deep and 12 inches tall.

I used one of the extra pieces of cardboard to cut a center piece with peak. My box isn't as tall as I would have wanted--but we're working with what we've got here. I hot glued the center piece to the box. I marked and cut some of the window openings and now have to double cut the front center panels.

Here's the box after about 20 to 30 minutes (honest) of work. I have a little door that I later remove. The flaps are down. I remembered that this was the way I had done the roof--not the other way. Forgive me! These flaps are too long and will cover the windows so I had to trim about 1.5 to 2 inches off the edge of each flap all the way around. See how I removed a section of flap for the center of the roof?

In order for the roof to stick out from the sides of the house--I added hinges (hot glue) that I made from the cut off flaps. Fold in half, glue and stick onto the under side of the flaps. Then comes the hard part. Adding a line of glue at the crease, folding the flap down and HOLDING the flap down till the glue hardens. I am NOT good at WAITING. So I taped the flaps after awhile. A short while.

Here's my house. Taped and waiting for the next steps. I cut more windows in the bottom by the door and cut two windows in each side of the box--one over the other--level with the ones on the front.

Tomorrow I will decide if the house gets spray painted black or sponge painted Gingerbread Brown. I will also go purchase some black FunFoam to cut into shingles. If the local 5 & Dime has some Halloween items--I may get some "decor".

I'm going to have to figure out how to get the roof flaps to all connect. Right now the corners are open. Got to "sleep on it". It was good to actually make a house. I found some of my tutorial was way off base. But my box is looking way cute.

Sunday, October 08, 2006

Spooky House Tutorial

Here's the finished product--you'll be refering back to this as we go along.

We're going with the October 10th tutorial on most of this. So I deleted a bunch of stuff and will continue to delete from this tutorial as the other one is completed.

This is a drawing of a rectangular sheet of black "FunFoam". About the size of typing paper. (Joann's or Michaels) When I made my house years ago, I cut all the roof shingles with scissors. But "FunFoam" cuts easily with a rotary cutter and ruler--so do it the easy way. Then you only have to trim the curved edges with scissors. Fun to do this while watching television. Again the size here is for a 18 each wide box. So cut the foam sheets across into 3 inch wide strips and then cut the strips into 1 1/2 inch rectangles. You'll need about 10 sheets of foam. You can always return any uncut sheets. Or use black construction paper but it won't have the "dimensional" look.

Start shingling your roof. Do one side completely and then do the next. I did the front, back and then the sides. Overlap the joints as you work from the bottom edge to the top. Just barely cover the previous row of shingles with the next row---that way you won't be making foam shingles forever. But do cover all the cardboard. Use a glue gun. When all four sides are done, finish off the seam edges with another layer of shingles. Or use black gimp braid.

Now from the inside of the box, glue orange or yellow tissue paper to the inside of the windows to give the house a "glow" when we light it up. Oh, yeah! We're going to add a little light to this house. A night light. So glue your tissue paper to all the windows and if you want to add some spooky cutouts or skeletons to the inside of the windows--do it now. I used Shiny Black Dimensional Paint (Joann's) to draw the window dividers onto the front of the tissue paper in the windows. Lay the box on it's side to make it easier to draw and paint. OR use little twigs from the yard to make the window frames and dividers. Looks real cute. Cut them with your garden clippers and hot glue down.

Now you get to decorate the house. I didn't put any windows on the back of my house. Instead I glued two strips of dress gimp (black braid) down the back of the house and filled in the center strip ( about 5 inches wide) with glitter. I used glitter on the front also. You can glue gimp anywhere on the house that you think will look cute.

I added a string of orange and black beads to the edge of the roof in a scallop. I made the string of beads. Just be very careful not to burn your fingers with the hot glue--use a chopstick. I glued spiders and bats on the roof. I glued real sunflower seeds to the house originally as a very attractive design element. The mice in my attic loved the tasty seeds. So I finally made fake seeds out of black and white swirled Sculpty clay, shaped the clay into seeds about the size of my pinky fingernail and baked the fake seeds. I then glued them to the house. Refer to finished house picture--in fact use it as a guide to "seed" placement. You can also use big beads.

I added spiders, a bat on the roof peak, a giant tarantula and the plastic skeletons. I even glued a skeleton in the doorway (to the tissue paper from the inside). When the light shines "just so" the lucky children "see" the skelton in the doorway and scream! I found a lifesize crow and attached him (or her) to the roof.

This house is about 6 to 8 years old and has been on display in the public library or a school library every Halloween (usually the entire month of October). The condition of the house is as good or better than the month it took me to make it. Whenever I find a "cool" item that would look good on the house, I glue it on. I made the house with only a small photo from the Martha Stewart catalog as a guide. I had no measurements. No idea if it would work. I just tried my best. And worked out the design elements as I went along. I've done the hard work. Your house will go together faster. If you need help--I'm here. Just blog me.

Sunday, Sunday

We got absolutely NOTHING done yesterday and it looks like more of the same today. Patty says "come over and pick peaches" so we may do just that. Made biscuits, bacon and scrambled eggs for breakfast--no grits. The remainder of the tomatoes will become fresh salsa later today and we will scoop it up with chips. Oh, I do love the fresh taste of tomatoes, onion, jalapeno and lime. Maybe a margarita to go with. I can drink if I don't take the anti inflamatory drugs. You can see what my priorities are can't you?

I have two cardboard boxes for the Spooky House tutorial and need to do some drawings and snap some pictures. I hope the Moms out there will give it a go--your kids will go crazy over it. Writing a tutorial is very intensive. You have to remember every step and pitfall.

I went to Marden's and spent only $13--can you BELIEVE IT??? I bought 3 1/2 yards of 60" natural cotton twill for $4.35 and washed it with bleach when I got home--- there were mildew stains on one edge. Well, the mildew is gone and now I have WHITE cotton twill. What I wanted in the first place. I selected and PUT BACK several bolts of fabric. I am ever so proud of myself for NOT buying anymore printed commercial fabric. I also bought spray adhesive for the Spooky House demo. And G bought personal size packages of candy "for his lunchbox".

Now G is out pulling up the tomato plants, dill and perhaps the celery. Then we have to dig up the dahlia tubers and let them dry up before storing them in the basement (cellar in Maine speak). The dahlias had a terrific season in the good garden soil and got huge. That makes me think my regular flower bed soil is in need of inmprovements.

Got to go. See you soon!

Friday, October 06, 2006

What A Day!

This is the second time I've used this title. Don't remember the other day, but this one was a doozie. Sunspots, full moon whatever--no computer service and the library is still open for business. We were scanning everything into Microsoft Notes and sometime this weekend we'll have to type the numbers into people's records. Unless, of course, they don't fix it and then we'll be doing it on Tuesday--after the Monday holiday. God, I hate Tuesday's at work after a long weekend or Monday closed.

Tomorrow I'll work on my Spooky House tutorial for those Happy Halloween crafters out there. Get your cardboard cartons ready!

Thursday, October 05, 2006

The Spooky House and Other Stuff

This morning the Spooky House got picked up and transported to Hawthorne School for the month of October. Last October the house was the guest of the Curtis Library. The kids just love the skeletons, spiders and bats that decorate the house. The windows are decorated with Sculpty "sunflower" seeds I made last year. I swirled black and white clay together and then made small-- findernail size-- seed shapes and baked them. Click to see larger.

Last night I had "plans" for showing and telling how to make your own Spooky House. If there is interest I will do it. If not. Not. It's really just a cardboard box all jazzed up. And it has lasted far longer than I anticipated. Those of you who read Martha Stewart Living will recognize the house--Martha had a much smaller one for sale in her catalog. Well, I like bigger so I made my own.

Another Subject. That Hand, Foot, Mouth virus I had in late June/early July is still causing problems. Now my fingernails are showing a "bubble" that must have started with the virus and is now causing the nail to crumble and peel. My beloved long, red, gel nails had to be removed. After years (we think nearly nine or ten) I have short nails and am typing with the pad of my finger--which feels really weird. Looking at my plain, not so pretty nails isn't pleasant either. They don't hurt, but the nail is thin and I could hurt myself if not careful.

My garden is being "put to bed" for the winter and in a few weeks G and I will be shredding garbage cans full of leaves to blanket the raised beds. I need to buy lime for the garden to sweeten the soil over the winter. I also need to call and get replacement raspberry bushes. Five of the 12 didn't survive. I just hope G's weekend off coincides with dry leaf time. He works one weekend and is off the next. I'm not liking this aspect of the job.

I covered each of my trash formations with tulle or net and I'm just going to stitch a grid pattern over the top. The tulle will hold all the bits down (I'll need to press it with the iron and put in a few pins to hold everything together, but this is easier than using glue). And with the condition of my nails--glue is out for a while. I used lavender, pink and navy tulle.

I have to admit that yesterday I stood in front of my fabric closet and looked at the absolutely FULL shelves and felt defeated. How on earth can I ever use all of it to make wonderful things? There is just too much. And lately, the pieces I've been working on, use so little. I start with a small pile of fabric and scraps--make a piece and it seems like the pile I started with is the same size--or possibly bigger. You would think the pile would disappear.

The only real way to use up large amounts of fabric is to make bed size quilts. UGH! I can't even begin to describe the agony that would be for me. I love the finished product but the tedious, repetitive work---oh, I just can't do it. I will have to drag each piece of fabric out and cut a strip or two from them for my trashy pieces. So many of the fabrics are so cute. All those cheerful dots.

I've also been thinking about this blog--as my Blog-o-Versary is on October 14th. I'm thinking I should be more serious. You know--indepth stuff, how to's with pictures, philosophic discussions on aging, art and society. Right.

Sunday, October 01, 2006

Finally, Some ART!

I received a very nice package of scraps from "Studio in the Woods" a few weeks ago and used a good deal of it in this *Trash Formation*. They have been ironed but not sewn so strips get attached to the sleeve of my flannel robe and you can see evidence of that in the lower left corner.

This was created from my own scraps. I wanted to make a lighter, more feminine scrap piece but then wasn't satisfied with the monotone so had to de-create the piece and add some darker tones. Still in progress. These pieces are all twelve inches square.

This piece deviates from the "strip" method and I used bigger blocks of fabric. It's harder to get the mass of texture and color that the strips give a piece this small but this piece has a strength the others don't have. The top stitching and quilting should help unify everything. At least I hope it does.

Before my husband left for work this afternoon he cut these beautiful dahlias from the garden. The orange, red and touch of yellow and white are so autumnal and give my clean kitchen a nice "decorated" look. We must really have had "magic" dirt this year as everyone who gardens--including the Portland newspaper gardener--is complaining of a bad year. We had an abundance of everything. I even took a gallon bag of late cucumbers with me to my Dad's along with dill heads and made him Refrigerator Pickles. He was delighted.

I'm really trying to keep the kitchen as clean as I found it when I returned from my Dad's. G really cleaned everything. I've been making all his favorite dinners as a way of saying "thank you".

On today's list: Banana Bread from the dead bananas in the fridge. Apple Chutney. (both items left over from the week before I went away). Perhaps some Mexican Rice for burritos tonight (I like them, G does not, but he has homemade Chicken Noodle Soup). I'd like to start sewing those three trashy squares. I have tons of TiVo to watch-- stuff it recorded while I was away.

I managed to get the Sculpty sunflower seeds glued to the Spooky House yesterday. It's going to Hawthorn School Library for the month of October. I should go take a picture of it for you.

I saw an ad in the local paper asking for people to come work 10 hours a week: cutting, frosting and decorating Divine Brownies. Do you think they pay you to do that or do you pay them?